I can't stand spending money on items that are destined for the landfill. Diapers, wipes, sanitary pads, paper towels and especially expensive Ziplocs no longer have place in our home. Not only have we saved hundreds of dollars a year by not purchasing these "throw-away" items, they are also really fun to make yourself!
These bags feature a gusset at the bottom, so they open nice and wide, and don't squish sandwiches! Gussets allow the bags to hold more stuff (or wider items) and collapse flat when they’re not in use.
I designed these snack bags this past spring for a trip to Mexico, and we have a drawer full of them! I use them daily for granola, sandwiches and even our car toys. My son is starting school tomorrow (1st grade - eek!) and he wanted his own cool bags for his lunches. He picked out this "awesome" flame fabric from the scrap bin at our local fabric store, and he can't wait to have lunches in them! Last year, his friends all told him that they wished their moms would make them some cool lunch bags too (blush!), so this is your opportunity, Moms!!
Need:
Sewing Machine
Scissors
(2) 7"x 7" Cotton fabric of your choice
(2) 7"x 7" Ripstop Nylon fabric
1 each 1/2"x 5" Hook and Loop Velcro (I cut mine to 1/2", but you can leave yours whatever thickness you like)
Step 1. Cut out (2) pieces of 7"x 7" Cotton fabric, and (2) pieces of 7"x 7" Ripstop Nylon for the liner.
Step 2. Place right sides of the fabric together and stitch the two (right and left) sides together with a 1/4" seam allowance.
This will make a "tube" of fabric. Repeat with the ripstop liner fabric, so you have 2 separate "tube" pieces.
Step 3. Turn the liner fabric inside out, and slide it inside the cotton fabric "tube", so that right sides are together. Make sure to line up the seams on the sides. You can pin the fabrics together at this point if you like. (I rarely do, but that is just me)
Step 4. Choose which side will be the top of the bag, if your cloth has a top direction, and position this side in sewing machine. Sew through 2 layers of fabric - 1 cotton layer, 1 liner layer. Stitch *almost all the way around on one side. Leave a 3" hole un-stitched for later (Step 9). Make sure you don't accidentally stitch through all 4 layers.
Step 5. Pull the liner out, and lay flat, right sides of the fabric inside, aligning the side seams.
Step 6. Sew a straight line along the bottom (open) end of the liner fabric. Repeat with the other cotton fabric side.
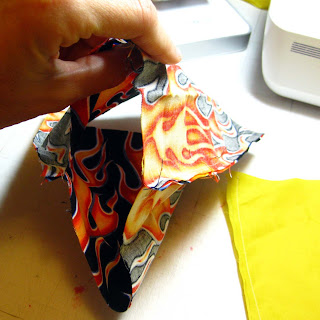
Step 7. Create a Gusset: On the bottom corner, pinch and slide the bottom corner of the fabric into a point, so that the seams align with each other on opposite sides. It helps to open up the bag a bit to give you some room to slide the fabric around. Pin, or iron this flat. (See the pic in Step 8 for clarification).
Step 8. Sew across this point in about 1" from the end. Note - you can make these as large or as small as you like, the larger (longer) you measure away from the point of the fabric, the wider the bag will be. Don't make it too wide (over 1 1/2") or the bag will be too small to fit a sandwich.
Repeat on the other side. Then do the exact same with the nylon side.
I like to trim the excess fabric triangle off, as it makes the bag less bulky. Be sure not to cut through the seam.
Step 9. Remember the hole we left open in Step 4? Turn the bag inside out through this hole.
If you forgot to leave a hole, gently use a seam-ripper and open up a hole.
Nice huh!
Step 10. Tuck the liner fabric down into the cotton fabric.
Step 11. Topstitch around the opening of the bag to help it lay flat.
Step 12. Line up the hook side of the velcro along the top, and stitch around. Repeat with the loop side. Finished!
To clean, just wipe clean with a damp cloth, or toss in a cool water washing machine and dry.
Congratulations!! Aren't you proud of yourself? By using fabric sandwich/snack bags, we can save thousands of plastic bags from becoming non-biodegradable trash filling up landfills and floating in our oceans!


2 comments:
loved the cute bag....it has such a cute fabric...and yes it is easy
Thats wonderful ... loved ur other posts too !!
- Smita
littlefoodjunction.blogspot.com
( fun food ideas for picky eaters )
Post a Comment